
Do you rely on Qlik Sense for your business intelligence needs? Many companies do! If that’s the case, you might be looking for a way to share those insights visually across your organization with live dashboards on TVs in different locations.
Are you new to Qlik Sense (Business Intelligence) or Valotalive (Workplace Digital Signage)? We’ve got you covered with a quick intro. Already familiar? Feel free to skip ahead.
Introduction
This blog post is a step-by-step guide on securely integrating Qlik Sense dashboards with Valotalive digital signage. With this secure connection, you can display live data insights on your workplace screens without ever needing to publish sensitive Qlik Sense dashboard URLs.
The Valotalive Qlik Sense app is in early access, our friendly customer success team is happy to activate it for you per request.
What is Qlik Sense?
Qlik Sense is a business intelligence (BI) and data analytics platform that helps users turn their information and data into insights. The service is used in sales, marketing, production, or finance to name a few examples. The platform integrates with multiple data sources, such as databases, spreadsheets, and cloud applications. You can build charts and dashboards around live data to uncover insights and make well-informed decisions.
What is Workplace Digital Signage?
Imagine a network of digital displays scattered around your office, factory floor, or lobby – that’s workplace digital signage. It’s not just TVs. These screens can come in a variety of sizes and forms, but the real magic happens behind the scenes. A central content management system is your control center. Update information effortlessly – either integrate data directly from your favorite apps or upload content manually – and see it reflected on all your digital signage screens instantly. Finally, a media player acts as the bridge, connecting each display to the cloud-based management system.
What is Valotalive?
Valotalive is a software company specializing in workplace digital signage. The award-winning content management service is used in more than 50 countries globally. Valotalive stands out for its focus on workplace digital signage. They make it easy to connect your displays with popular business apps, like Qlik Sense. This lets you bring real-time updates and data dashboards directly to your employees, right where they work.
Prerequisites
To get started, you’ll need three things: a Qlik Sense account to access your data insights, a Valotalive account to manage your digital signage content, and the hardware itself – displays and media players – to display the live dashboards at the needed locations.
Next, we’ll go through each component at the time:
Qlik Sense account
Before you jump in, make sure your Qlik Sense account is prepped. You’ll need some Apps and Sheets in place. Think of Apps as containers for your data insights, and Sheets as the visual reports or dashboards where those insights come to life.
Our task is to display the live sheets from Qlik Sense on the company TVs (digital signage screens).
Valotalive account
Next up, is your Valotalive account with an active subscription. Think of Valotalive’s apps as integrations that automate your content updates, and flows as the playlists that schedule what shows up on your screens. We’ll be using the Qlik Sense app specifically to integrate your data insights.
The Hardware
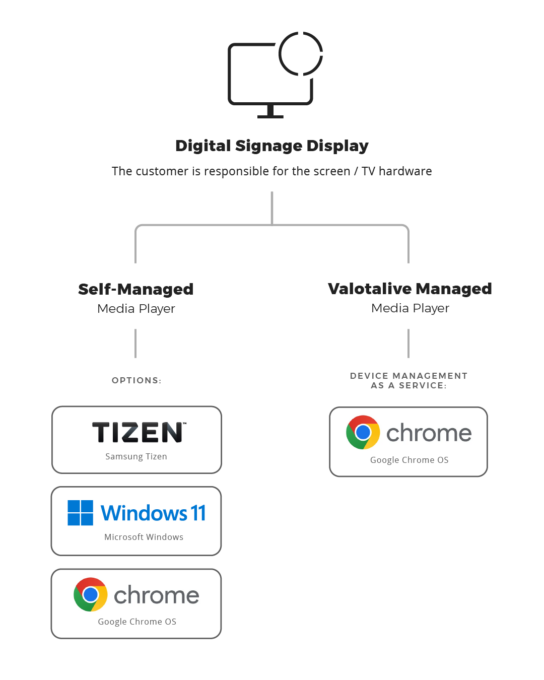
Finally, the hardware. Here’s what you’ll need:
3.1 Media player: This compact device acts as the brains behind your display, connecting Valotalive to your screen.
For the media player, you have some flexibility!
Do-it-yourself: If you’re comfortable managing your hardware, Valotalive works with ChromeOS, Windows, or Samsung Tizen devices.
Managed solution: Would you prefer a hands-off approach? We offer managed media players that come pre-configured and ready to roll.
3.2 Professional display: A professional display is recommended. Unlike a regular TV, a professional-grade display is designed for continuous operation, ensuring smooth performance for your digital signage needs
Connecting your display with Valotalive
Once you have everything set up, it’s time to connect your display to Valotalive! Here’s the easy process:
- Make sure your media player is running the Valotalive app. You can find it in the Chrome Web Store (for ChromeOS devices) or the Microsoft Store (for Windows devices). Samsung Tizen devices will have a different setup process.
- Look for a PIN code on the display. Once the Valotalive app is running, you should see a unique PIN code displayed on your screen.
- Head over to your Valotalive account. Navigate to the “Displays” section and look for “All Displays.”
- Click “New Display” and then “Claim Display.” Name your display and enter the PIN code you saw on the screen to link your display with your Valotalive account.
Tip: If you’re using a Samsung Tizen device, Valotalive’s help center has specific instructions for claiming the display.
Activate Qlik Sense In Valotalive
Now, let’s activate the integration and bring your Qlik Sense dashboards to life on your digital signage.
Here’s a quick breakdown:
- Authorize Valotalive with Qlik Sense:
- This step allows Valotalive to securely access your Qlik Sense data.
- Set up the Qlik Sense app in Valotalive:
- Here, you’ll choose the specific Qlik Sense dashboard you want to display and configure how it appears on your screens.
Authorising Valotalive with Qlik Sense
To securely connect Valotalive to your Qlik Sense account (cloud-based), we’ll use a method called key-pair authentication. This ensures your data stays safe. To complete this step, you’ll need access to the Qlik Management Console and your Qlik admin credentials.
The high-level steps are:
- Setting up Qlik Sense
- You’ll create a new web integration in Qlik Sense
- Authorising Qlik Sense in Valotalive
- You’ll authorize the connection with Qlik Sense and Valotalive will generate a certificate file for a secure connection
- Adding the identity provider in Qlik Sense
- You’ll import the Valotalive certificate into your Qlik tenant’s Identity Provider settings
- Configuring Content Security Policy (CSP) in Qlik Sense
- You’ll define a list of trusted origins (Valotalive’s URLs) within the Qlik Sense Content Security Policy
- This ensures that only authorized domains can access your data visualizations.
- Granting access to Valotalive user
- You’ll grant this user view-only access (analyzer license) to the specific Qlik Sense dashboards you want to display on your digital signage screens
Don’t worry if this seems like a lot of steps. Valotalive’s Help Center has detailed instructions to guide you through the process. While there are several steps, it’s quite straightforward.
And if you ever get stuck, Valotalive’s Customer Success team is happy to hop on a quick video call to help you with authorization and app activation.
Set up the Qlik Sense app in Valotalive
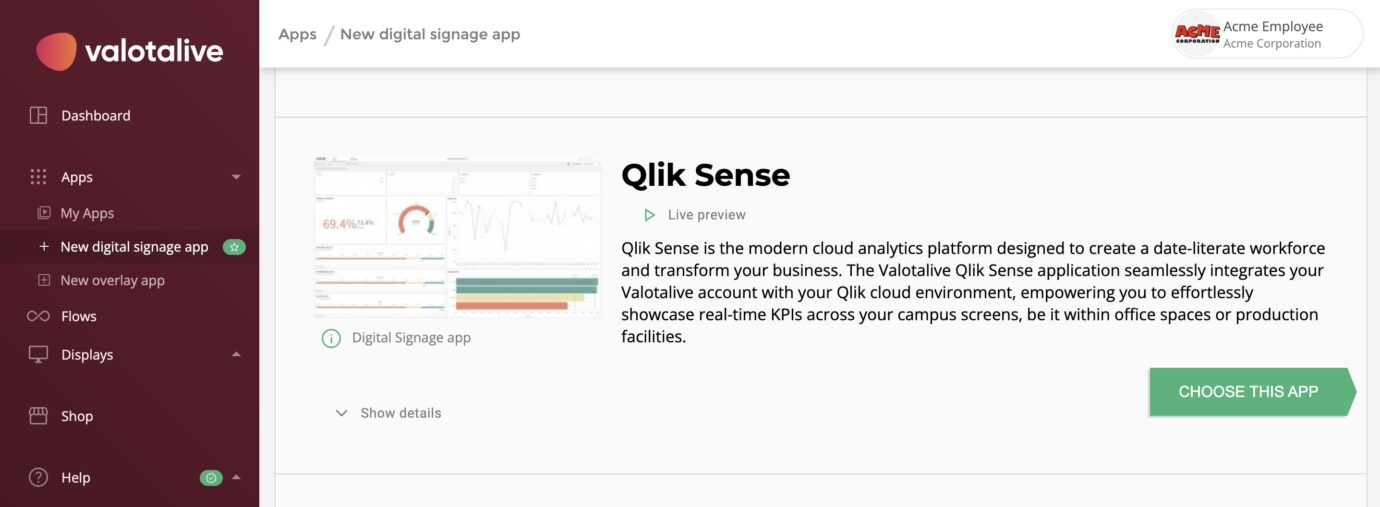
Step 1: Select the Qlik Sense App in Valotalive
- Open your Valotalive Dashboard and navigate to Apps > New digital signage app.
- Locate Qlik Sense from the available apps and click “Choose this app” to begin the configuration.
Step 2: Configure the Qlik Sense App
- Look for the Qlik App ID field. This ID can be found in the URL of your Qlik Sense app. It’s the part of the URL that comes after “…/sense/app/”. Paste the ID into the corresponding field in Valotalive.
- Similarly, locate the Qlik Sheet ID field. This ID can be found in the URL of the specific sheet you want to display. It’s the part of the URL that comes after “…/sheet/”. Paste the ID into the designated field in Valotalive.
- Once you’ve entered both IDs, click “Save” to complete the configuration.
Add the Qlik Sense app to your Display
Once your Qlik Sense app is activated, it’s time to display it on your screens.
Here’s how:
- Navigate to Displays: Head to the “Displays” section within your Valotalive dashboard.
- Find Your Display: Click on “All Displays” and locate the specific display you want to use.
- Open Settings: Click on the chosen display to access its settings.
- Add the Qlik Sense App: Look for the “Add App” button and click on it.
- Choose Your App: From the dropdown menu, select the Qlik Sense app you just configured.
That’s it! Your display should start showing the live dashboard within a moment.
Manage Multiple Displays Efficiently:
While you can add your Qlik Sense app directly to each display, Valotalive offers some powerful options for managing multiple screens:
- Flows: Think of Flows as playlists for your digital signage content. You can schedule the Qlik Sense app alongside other content like news from SharePoint, videos, or even social media feeds. This allows you to create a dynamic and informative display experience.
- Tags: Assign tags to your displays to group them based on location, department, or any other criteria. Then, simply assign your Flow (playlist) to the relevant tag, and the content will automatically show up on all the tagged displays. This saves you time and ensures consistency across your entire digital signage network.
In short, Flows and Tags help you streamline content management for multiple displays.
Ready to unlock the power of live data on your digital signage?
Start your free trial of Valotalive today and see how easily you can integrate your Qlik Sense dashboards! The Valotalive Qlik Sense app is in early access, our friendly customer success team is happy to activate it for you per request. Start you free trial here


